Posters

Artel Poster: 10 Tips To Improve Your Pipetting Technique

10 Tips To Improve Your Pipetting Technique

Of all the factors contributing to the performance of a pipette, the most critical is the skill of the operator. Whether you work in a regulated environment and need to demonstrate pipette operator proficiency, are responsible for quality assurance, or simply want to ensure that your lab generates reliable, reproducible data, pipetting technique and the performance of your pipette are paramount.

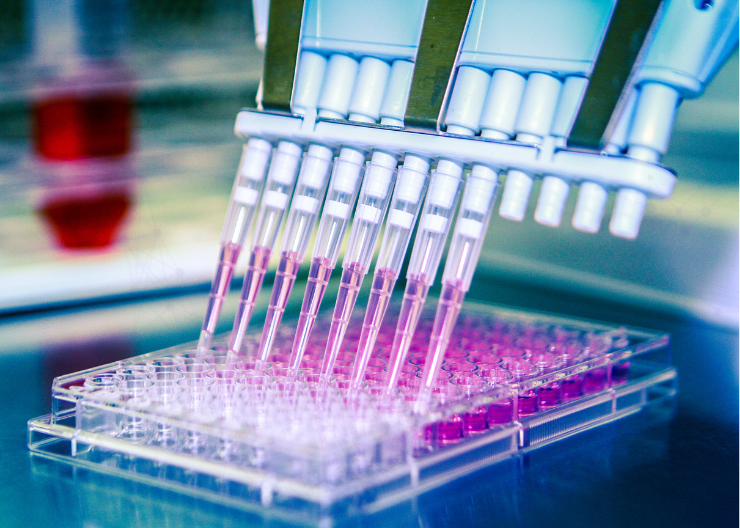
This poster demonstrates the fundamentals of pipetting technique, such as plunger pressure and speed, selection of proper pipetting mode and pipette tips, and the need to work at temperature equilibrium.

Download Poster

Please fill out this brief form to download this content.

One moment while the form loads...

Please note, browsing in private or incognito may not be supported and may not allow forms and other elements to load correctly.

1. Use the Correct Pipette Tip

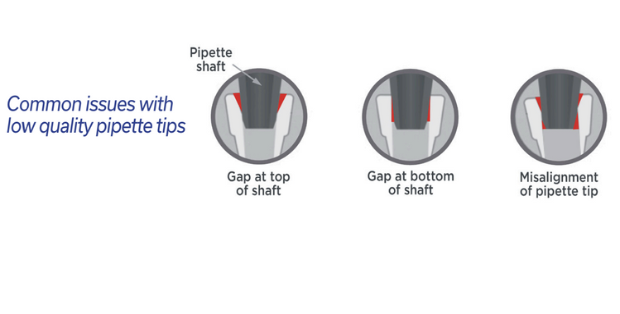
For the most accurate pipetting, the pipette manufacturer’s recommended tips should be used. Pipettes are designed to work properly with particular tips.
It is important to verify that alternative brand tips form a tight seal, are properly aligned and perform accurately with the pipette. Each pipette shaft has a specific taper design and a poor tip seal can result in errors.

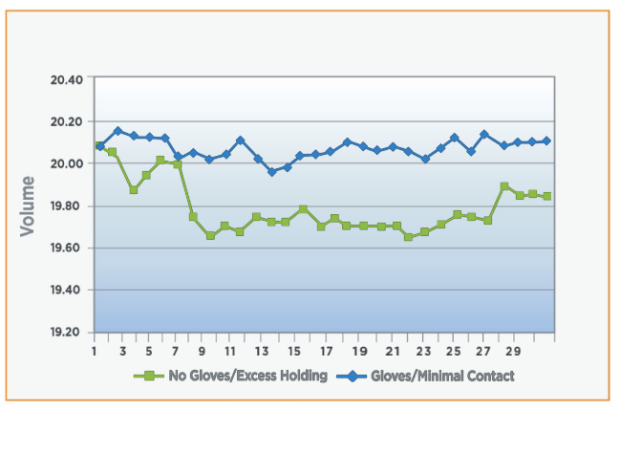
2. Minimize Handling of the Pipette and Tip

Handling a pipette for prolonged periods of time will cause the barrel of the pipette to heat up, leading to an expansion of the captive air volume, ultimately decreasing the delivered volume. Methods to reduce heat transfer include holding the pipette loosely, returning it to the pipette stand or setting it down between deliveries. Special care should be taken to avoid handling pipette tips and sample vessels/tubes.

3. Work at Temperature Equilibrium

Allow pipette, tips, sample solutions, and labware to equilibrate in testing area prior to pipetting. Up to two hours may be required depending on environmental conditionals. The volume of liquid delivered by air displacement pipettes varies with relative humidity and vapor pressure of the liquid both of which are temperature-dependent. Working at a constant temperature minimizes variation of aspirated volume.

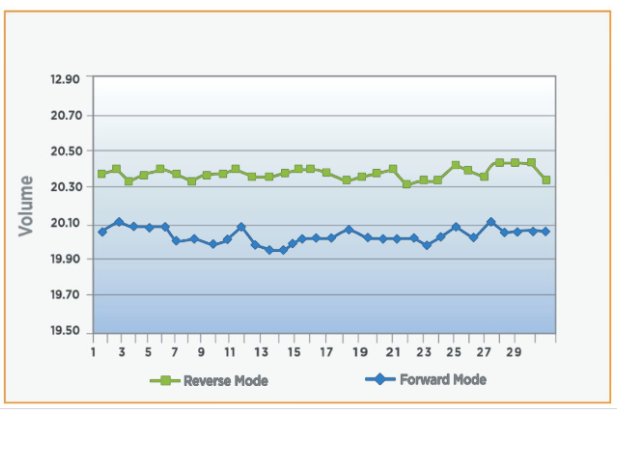
4. Use Forward Mode Pipetting

Forward mode (also referred to as standard mode) is the method most commonly used by pipette manufacturers for calibration. Press the plunger button to the first stop, immerse the tip into the sample and release plunger button to aspirate the aliquot. Remove tip from the liquid and press plunger button to second stop to dispense the entire contents. While forward mode pipetting yields better accuracy and precision than reverse mode for many solutions, reverse mode may be the preferred method for viscous or volatile samples. When using reverse mode pipetting, keep in mind that samples may be over-delivered with this method.

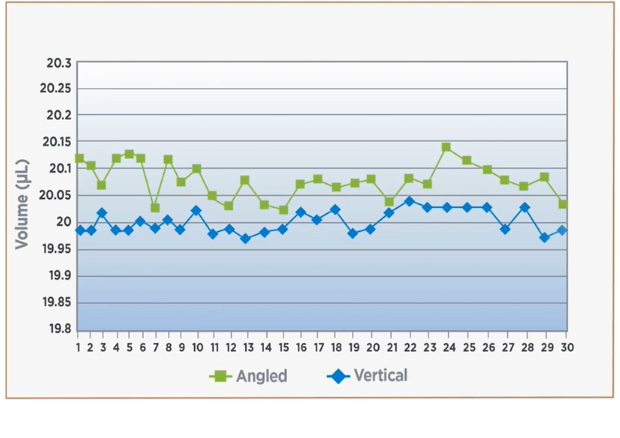
5. Hold Pipette Straight While Aspirating

Hold the pipette in a vertical position and prevent the tip from touching the sides or bottom of the sample vessel. This will ensure an optimal and undisturbed hydrodynamic flow of the sample during aspiration. This technique is especially important when pipetting small volumes (less than 50 µL). Holding the pipette at an angle during aspiration alters the sample volume. Touching the sides of the vessel causes wicking and loss of volume.

6. Prewet The Pipette Tip

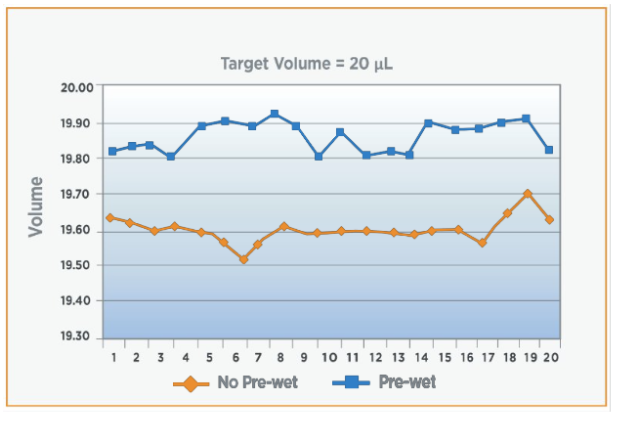
Each time a new tip is applied to a pipette, the captive air inside the pipette tip will have a lower humidity level. This increases sample evaporation. Repeated aspirate/dispense cycles prior to aspirating for delivery will increase the humidity inside the tip, thereby decreasing the amount of sample evaporation. To properly prewet the pipette tip, aspirate, remove tip from sample, and fully expel the liquid at least three times.

7. Pause Consistently After Aspiration

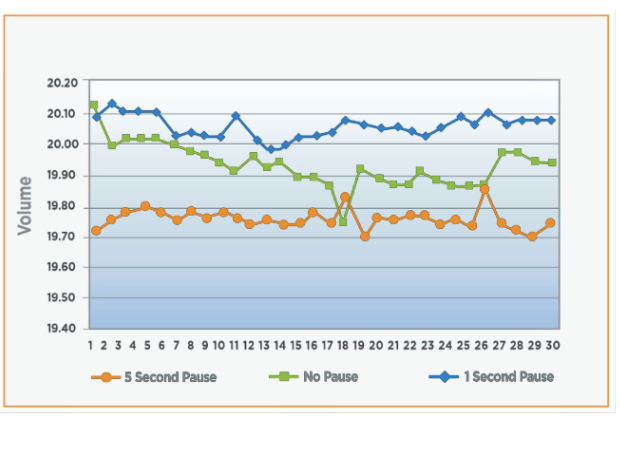
Once the plunger button has been released, pause for ONE SECOND with the tip still immersed in the sample, allowing the liquid to “settle” in the tip. Make this pause as consistent as possible.

The sample continues to flow into the tip for a short time after the plunger button reaches the top stop. At the same time, evaporation within the tip is occurring. Therefore pausing for too long will result in under-delivery. Pausing consistently balances these two effects and ensures correct aspiration.

8. Immerse the tip to the proper depth

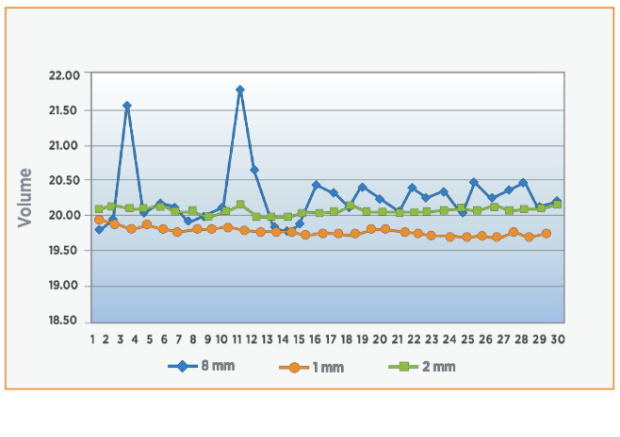
While holding the plunger at the first stop, immerse the tip to the correct depth below the meniscus. The correct depth depends on the pipette volume. Shallow tip immersion increases the risk of aspirating air. Deep immersion increases the risk of droplets on the outside of the tip, and also forces more sample into the tip. Inconsistent immersion degrades precision.

9. Use consistent plunger button pressure and speed

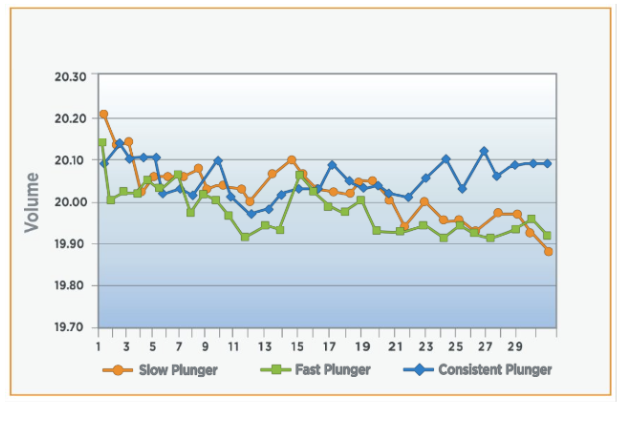
Pressing and releasing the plunger button with consistent speed while aspirating and dispensing the sample is important for achieving precise and accurate results. Allow the plunger button to settle at the top stop before beginning the next aspiration sequence. It’s all about consistent rhythm-repeatable actions produce repeatable results.

10. Examine the tip before and after dispensing

Before dispensing, carefully remove droplets on the outside of the tip with a lint-free cloth. Be sure to stay clear of the tip opening to avoid wicking liquid out of the tip. Excessive tip wiping can cause sample loss and under-delivery. Once you are ready to dispense, place tip against receptacle wall, press plunger button to the first stop then drag the tip up the receptacle wall while pressing to the second stop. Surface tension will help draw the remaining liquid out of the tip.

Related Resources

Learn more by checking out our additional educational resources below.

Liquid Handling Case Study

Keeping Plasma Safe: Haematologic Technologies Inc. Implements the Artel PCS for Quality Assurance

View

Liquid Handling Case Study

Flying on Course: FAA’s Forensic Toxicology Lab Enhances Quality and Compliance with the Artel PCS

View

Liquid Handling Case Study

The Impact of the Artel MVS: When Analyzing Cancer at the Molecular Level, Microliters Matter

View

Liquid Handling App Note

Evaluating Volumetric Performance of Beckman Echo Acoustic Liquid Handlers with Artel MVS vs. Fluorescence Test Methods

View

Liquid Handling App Note

Optimizing an ALH with Custom Glycerol Solutions Using MVS® and ArtelWare® Version 2.3

View

Liquid Handling App Note

Calibration of Multichannel Pipettes Using the Artel MVS®

View

Liquid Handling Webinar

Virtual Demo | Artel MVS® Multichannel Verification System

View

Liquid Handling Webinar

Virtual Demo | Artel PCS® Pipette Calibration System

View

Liquid Handling Webinar

Assuring Microliter Volume Handling in Molecular Analysis Using Dual-dye Ratiometric Photometry

View

Liquid Handling Posters

Artel Poster: 10 Tips To Improve Your Pipetting Technique

View

Liquid Handling Posters

8 Easy Steps for Performing Pipette Preventive Maintenance

View

Liquid Handling Posters

Effect of Liquid Handling Quality Control on Biological Assay Performance

View

Liquid Handling Knowledge Center

Metrological Traceability of In-House Calibrations

View

Liquid Handling Knowledge Center

Minimizing Liquid Delivery Risk: Pipetting Technique as Source of Error

View

Liquid Handling Knowledge Center

The Role of Automation in Liquid Delivery Quality Assurance

View